Part I: EC2 - The Ultimate Guide to Saving Money with AWS Reserved "Anything"
* Price calculations using AWS Price List API
Most AWS customers have at least heard of AWS Reserved Pricing. While the concept is
popular mainly because of EC2 Reserved Instances, it actually applies to many other
AWS Services. In this series, I’ll walk you through what to look out for and tips on how to
save money by purchasing Reserved capacity in AWS. We’ll start with EC2.
But don’t worry, this isn’t just another article on how to purchase EC2 Reserved instances! I’m including
live calculations, examples, tips and a set of steps you can follow to save some real money in EC2….
First, what is Reserved Pricing?
The concept is simple: commit to a 1 year or 3 year period for a particular AWS resource type and save
up to 75% compared to the default pay-as-you-go On Demand pricing.
Sounds good, doesn’t it?
It’s a great way to save money, but the devil’s in the details (and there are many
details to consider here). The concept applies to multiple AWS Services, such as RDS, EMR, RedShift, Elasticache and
even DynamoDB.
In this article, I’ll focus on EC2. While there’s no official statistic from AWS, I can tell from my experience
(and from many reports out there) that EC2 is the service most AWS customers spend
the largest portion of their bill on.
If you reduce cost for EC2, you’ll make good progress towards reducing your overall AWS bill.
How much? Here’s a basic example that compares a very common Reserved option (Standard, All Upfront)
for a common EC2 instance type - an m5.large, in us-east-1. Feel free to choose a different instance type, region, or number of years.
You can also hover on the chart area to see more details regarding savings.
While the chart above is a good start, there’s more than simply considering “Reserved vs. On Demand”. So let’s take a closer look at all the options…
Terms and Payment Options
EC2 Reserved Pricing gives you the option to purchase compute capacity in 1 year and 3 year terms.
Also, you have the following payment options:
All Upfront. 1-time payment covering the full term (1 year or 3 years)
Partial Upfront. A portion of the full amount over the chosen term (also 1 year or 3 years).
The rest is paid monthly.
No Upfront. You commit to the full term and pay a regular fee every month.
The more money you pay upfront, the greater the savings. Here’s a comparison showing all payment options
(don’t forget to try different instance types, regions and to hover on the chart for more details):
You might have noticed that in many cases there’s no significant difference between All Upfront,
Partial Upfront and No Upfront - only a few percentage points.
TIP: Before committing to paying hundreds - or even thousands - of dollars upfront, take
a look at the No Upfront option (my preferred alternative in many cases). No Upfront
gives you almost the same amount of savings, without having to break the bank
at the beginning of your Reserved period.
Scope
Before choosing a Reserved option, it’s also important to understand the Scope of your reservations:
Regional. You get a discount applied to any EC2 instance of an applicable instance family
and OS in any Availability Zone within that AWS region. You don’t get reserved capacity, meaning
other customers who’ve purchased reserved capacity get priority should there be a hardware
shortage in that AWS region (while unlikely, it can happen).
Availability Zone. You only get a discount applied to instances in one particular
Availability Zone. Your EC2 capacity is guaranteed, but you lose the flexibility to update
instance size.
For example, if you buy one m5.xlarge running Amazon Linux with Regional scope, you can actually
launch 2 m5.large instances running Amazon Linux and get the Reserved discount applied to
both instances. You can launch them in any Availability Zone within the same region and save money.
If you buy that same m5.xlarge reservation with Availability Zone scope in us-east-1a, you
won’t be able to apply the same Reserved discount to 2 m5.large instances - only to 1 m5.xlarge
launched in us-east-1a. If for some reason you need to launch an m5.xlarge in us-east-1b, you
won’t get a discount. You will, however, get a higher degree of confidence that you can launch
a new m5.xlarge in us-east-1a in case EC2 is running low on compute capacity in that particular
Availability Zone.
If this sounds a bit confusing to you, don’t worry, you’re not the only one. To summarize, Scope
comes down to prioritizing flexibility (Regional) over guaranteed capacity (AZ). There’s no
cost difference between the two.
TIP: Unless you have very specific and critical capacity requirements, I’d recommend
choosing Regional scope. Instance size flexibility is a great feature that you lose if you
choose the Availability Zone scope. It’s also easier to save money by choosing Regional.
Offering Classes
There are two Offering Classes:
Standard. It doesn’t offer a lot of flexibility. Once you commit to a specific EC2
instance type (e.g. t2.large, c5.large), you can change instance size (large, xlarge, 2xlarge, etc.),
but not instance family (t2, m5, c5, etc.). Instance size flexibility only applies to Linux instances and
Regional reservations.
Convertible. It offers more flexibility compared to Standard. You can switch to different
instance families and sizes. But, of course, you don’t save as much money.
Offering Classes basically help you to manage risk. With Convertible you mitigate some of the
risk associated with potentially not choosing the right instance family, while Standard doesn’t give you that
flexibility. Of course, lower risk results in less savings. Standard is cheaper than Convertible.
Also, you can only sell Reserved capacity in the Reserved Instance Marketplace if you’ve bought
Standard (more on that below).
Here is a price comparison between Standard and Convertible for the All Upfront option (you
can choose a different instance type and region and hover on the chart to see more details).
As you can see, price differences between Standard and Convertible can start at about 10%
or even higher, depending on the instance type, region and number of years.
Don’t forget about choosing the right AWS Region
If you haven’t deployed your components in a particular AWS region yet and you have some flexibility, it’s
always important to choose your AWS region wisely.
When it comes to EC2 Reserved Instances, you can expect different savings according to the region you choose.
Take a look at the following graph that calculates total cost for Reserved Standard All Upfront (Linux) vs. On Demand. As you can
see, there are different savings (both in dollar amount and percentage) depending on the region you
choose (hover on the chart to see On Demand cost and savings):
What are the risks of Reserved Pricing?
In the best-case scenario, you’ll save a lot of money. But there are trade-offs that you
have to be aware of before you go the Reserved route.
Here are some important cost/benefit considerations I always think about:
Cash Flow
If you’re an application owner, you also have to consider how your applications relate to
your business. While it’s very appealing to save up to 75% on your EC2 bill, making a Reserved
purchase can potentially result in thousands of dollars spent upfront. This is money you
could spend on hiring, advertising, product development or other areas that could be equally,
or even more beneficial to your business.
On the other hand, you might be in a situation where a large expenditure could be a positive
thing due to accounting or tax reasons. Therefore, before making a large Reserved purchase,
consider doing some business number crunching or having a conversation with your accountant or CFO.
Tip: If you don’t want to spend a lot of money upfront, go with either the Partial
Upfront or the No Upfront option. You can still get some solid savings while avoiding a steep upfront fee.
Risks
Here are some examples of common risks associated with EC2 Reserved:
Inaccurate Provisioning
When you’re paying for your EC2 instances using On Demand pricing (the default), you can
always change the instance type and compute capacity for your applications. If something
changes in your business and you realize you don’t need as much EC2 capacity, you
can just shut down a few EC2 instances, or provision a smaller EC2 instance and lower your AWS
bill. With Reserved, you lose that flexibility.
Tip: Before purchasing Reserved instances, monitor system metrics in Production. Once
you’re confident a particular instance type is right for your workload, then consider purchasing
Reserved. Then go with Regional scope and gradually increase purchased capacity.
Better (and cheaper) generations of EC2 Instance Types
If you follow EC2 announcements, you’ll notice that new instance types are released quite often.
So what happens if a new, better EC2 instance is released while you’re committed to a 1-year
or 3-year Reserved purchase? You could miss out on better features or important cost savings - or both.
For example, a c5.large instance is 15% cheaper compared to the previous generation. An m4.large
is 23% cheaper compared to the previous generation, an m3.large.
Instance Type
Announcement Date
Savings vs. Previous Generation
c3
11/14/2013
N/A
c4
11/13/2014
5%
c5
11/06/2017
15%
c5d
05/17/2018
N/A
c5n
11/26/2018
N/A
m3
01/21/2014
24%
m4
06/11/2015
23%
m5
11/28/2017
4%
t2
07/01/2014
N/A
t3
08/11/2018
11%
Besides cost, there’s also the possibility of AWS releasing better versions of a particular
instance type. Take the c5 family, which was announced in November 2017. Six months later,
the c5d was announced, offering better performance for disk-intensive workloads. Then in
November 2018 came the c5n, which offers better network performance than c5 instance types.
As you can see, there’s always the possibility of AWS releasing improved versions of a particular
instance type, which is something to keep in mind before committing to a 3-year Reserved term.
Tip: Before committing to a 3-year Reserved term, take a look at when that particular
instance type was announced. If it’s been more than a couple of years, it might make more
sense to go with a 1-year reservation instead
Tip: If you discover you don’t need a specific Reserved capacity anymore (i.e. you
bought more than you need or bought a sub-optimal type for your workload), you can always
sell excess Reserved capacity in the Reserved Instance Marketplace.
Keep in mind this only applies to the Standard offering class and if you have a bank account
based in the US.
Important Metrics
Here are some relevant numbers to calculate, before committing to a Reserved purchase:
Savings vs. On Demand
Before making a decision, always keep track of both the dollar and percentage amount saved
by purchasing Reserved compared to On Demand. Savings vs. On Demand have to be calculated
over the whole term of the Reserved purchase, which could be 1 year or 3 years.
Upfront Fee and Savings
Reserved purchases have different degrees of upfront payment. While you can pay everything
upfront (and get the most savings), you could also pay a partial upfront fee or no upfront
fee at all. The more money you pay upfront, the higher the savings. Therefore, it’s very
important to calculate both.
Months to Recover
A critical metric to evaluate is Months to Recover. This tells you how much time you have
to wait before you start to see some savings compared to On Demand pricing. You’ll see that
in some cases, it’s almost a full year before you start to see some savings (sometimes more).
This number varies not only based on the Payment Option, but also on the EC2 instance type
and in some cases on the AWS region.
Comparing All Options
Let’s take a look at all of the options in a single chart. Here you’ll see how Standard vs.
Convertible compare against each other and also different Purchase Options and terms (1 year vs. 3 years).
The chart displays how cost accumulates throughout your commitment period and it shows Months
to Recover (MtR) as vertical annotations. Don’t forget to hover over the chart to see more
pricing details.
A Step-by-Step Approach
Now that we’ve been through the main details regarding EC2 Reserved, I highly recommend having
a repeatable, step-by-step process.
1. Gather All Relevant Data
This is the most important part of the whole process. Without data, you can’t possibly make
a good decision - especially on something that has so many variables, such as committing
long term to an EC2 instance type and a term that is right for your application and business.
Analyze Billing Data
Configure AWS Cost and Usage Reports and be ready to analyze them using tools such as Athena or QuickSight.
You can use AWS Cost Explorer as well, but in my experience, if you need more detailed information
it’s a good investment to analyze Cost and Usage Reports.
Find the top 10 Usage Types by cost in your AWS bill. Calculate the percentage they represent
of your total bill.
Is EC2 one of them? If not, maybe you should move on and tackle other areas that are costing
you more money (i.e. Data Transfer, S3 Storage, EBS storage, RDS, etc.)
If EC2 is an important part of your AWS bill, then identify the top EC2 Instance Types by
cost and proceed with the next steps.
Gather and Analyze System Metrics
Execute thorough Load Tests. Load Tests are an essential way to measure how your applications will
perform once they go live. When executing load tests, you can analyze system metrics as well as
customer experience metrics, such as response times and error rates under stress. Measuring test
results from tools such as
Locust can help a lot.
If your application is already in Production, make sure it’s been exposed to the type of
usage you expect in the long term. You should measure system metrics during periods of steady usage as well as steep spikes.
Make sure you’ve analyzed the following metrics:
CPU Utilization
Memory Utilization
Disk I/O and Throughput
Network Usage
Find the dimensions your applications are particularly heavy on and also the areas that aren’t
that important. For example, maybe your application doesn’t need a lot
of network throughput, or your application requires large amounts of memory.
Is there an EC2 instance type that could deliver better performance? For example, one with
more CPU or faster network throughput?
Would performance be improved by adding more EC2 instances? For example, if you’re using
Auto Scaling.
Are there EC2 instances that are under-utilized? Can you switch to a smaller instance type
without putting your application at risk? Or reduce the number of EC2 instances?
2. Apply Performance Optimizations
Configure Auto Scaling (Usage-based, Scheduled Actions, Dynamic Scaling or Predictive Scaling)
EC2 Auto Scaling is an essential part of any application that runs on EC2. Even though there
are cases where a single EC2 instance for a particular task is appropriate, in most situations
it makes sense to configure a fleet of EC2 instances managed by Auto Scaling. This will increase
performance and availability as well as reduce cost.
It’s also important to have Auto Scaling configured before calculating your Baseline Capacity (we’ll get to that later)
If you’re not using Auto Scaling, it should be clear to you why this is the case.
If your application is not using Auto Scaling, you first have to confirm that your application
is ready for it. For example, that it is stateless and that it can handle EC2 instances being
launched and terminated at any given time.
If your application is ready for EC2 Auto Scaling, then it’s time to configure it and think about
the right scaling rules. For example, when should Auto Scaling add or remove EC2 instances.
If your application has cyclical usage, then it’s very helpful to configure Scheduled
Actions. For example, adding instances during business hours and removing them on nights and
weekends. Or adding instances at the end of the month and removing them afterwards.
A great option is to try Predictive Scaling, a feature that configures scaling automatically based on
usage patterns and Machine Learning.
Optimize and Test
Once you’ve gathered data and configured Auto Scaling, the next natural step is to actually update
the EC2 instance types in your application.
If applicable, update EC2 instance types.
If applicable, update the number of EC2 instances.
If changes were made, execute load tests.
Analyze system data again and confirm these updates delivered the desired result.
“Let it soak” in Production
If your load tests brought the desired result, then it’s time to promote your changes to Production.
In this case I recommend:
Monitor system and customer experience metrics for a period of time.
Confirm Auto Scaling is configured properly, such that your application reacts well to
spikes in usage as well as Scheduled Actions (if they were configured).
Confirm you’ve provisioned the right instance type and size for your application.
Confirm there are no EC2 instances that are under-utilized.
3. Calculate the right amount of EC2 Reserved instances and Terms
You can only arrive at this step once you’re confident your application is running on the
right number, size and family of EC2 instances. It might take some iterations of performance
optimizations to get here, but it’s important you’ve chosen the right EC2 instance type before
purchasing reserved capacity.
Become familiar with EC2 Normalization Factors
If you’re buying Reserved Instances running Linux/Unix, using Regional scope and default
tenancy, then your RIs are eligible for instance size flexibility. In this case, EC2
Normalization factors become relevant. A Normalization Factor assigns a specific weight
to a particular instance size and allows you to compare EC2 instance sizes against each
other in a standard way. For example, an m5.2xlarge is 4 times the size of an m5.large,
or a t2.medium is twice the size of a t2.small. This relative size is also applied to
billing. You can find more information on normalization factors in the AWS documentation.
The recommendation is to buy reservations for an applicable EC2 instance with the smallest normalization
factor. For example, if you conclude that you need 1 m5.xlarge, then buy 2 m5.large reservations
(assuming your scenario supports instance size flexibility).
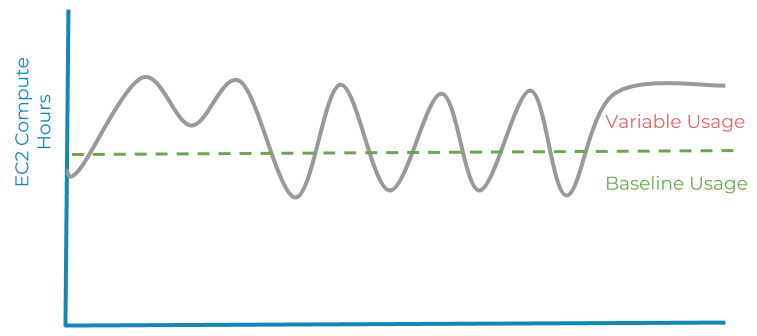
Calculate Baseline EC2 Instance Hours per Month
If you’re using EC2 Auto Scaling, you’ll have some variation in the number of EC2 instances
that power your applications. There will be spikes in usage, but there are also Baseline EC2
Instance Hours per Month, which is the minimum stable amount of compute hours you’ll need to
pay for each month. This number will determine the amount of Reserved instances that will
result in AWS cost savings.
Something like the illustration below:
Getting this number right will maximize your EC2 cost savings. The following steps will help you get there:
Calculate the number of hours you’re getting billed for a particular EC2 instance type and region per month.
For example, let’s say you’re getting billed 5420 hours for c5.large instances in us-east-1, per month.
Calculate the number of instance-months, based on billed compute hours. For example, 5420 hours are equivalent
to 7.53 instance-months, if you consider a month as 720 hours (5420 compute hours / 720 hours per month = 7.53).
Confirm the billing data you’re looking at corresponds to typical usage. For example, looking at a month with exceptionally
high usage might result in over provisioning.
In our example, consuming 7.53 instance-months means we should buy a maximum of 7c5.large
EC2 instances in us-east-1. If you want to be cautious, you can start by purchasing a smaller number
of reserved instances and then re-evaluate each month if it makes sense to purchase more.
Find the Right Options and execute the purchase
Now that you’re sure about the EC2 instance type and size you’ll need and you’ve calculated
the number of EC2 Reserved instances that will save you money, it’s time to choose between
the different options:
Scope: Regional vs. Availability Zone.
Standard vs. Convertible.
All Upfront vs. Partial Upfront vs. No Upfront.
1 year vs 3 years.
If your scenario supports instance size flexibility, don’t forget to buy reservations with
the smallest applicable EC2 Normalization Factor (e.g. 2 c5.large instead of 1 c5.xlarge).
To take a look at the comparison charts again, click here.
Remember, it comes down to choosing the right balance between savings, flexibility and risk. I
prefer to start small and then gradually purchase more reserved capacity, to make sure I
don’t overcommit.
4. Rinse and Repeat
After you purchase Reserved EC2 instances, you’ll have to take a look at your billing data
and system data and repeat the previous steps until you get to a point where baseline compute
usage is covered by Reserved instances.
If you discover that you bought more capacity than you need, or a sub-optimal type, you can
always consider selling some of your existing capacity in the Reserved Instance Marketplace
to recover some of your investment.
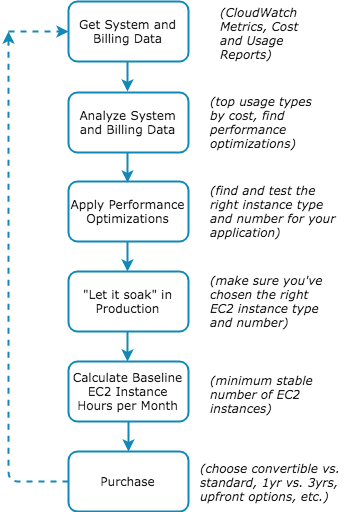
To Summarize
This diagram summarizes the steps described in this article:
Do you need help lowering your AWS cost?
Want to make sure you’re not overspending on your AWS bill? Feel like you’re spending more
than you should on AWS, but don’t know how to fix it or simply don’t have time?
I can save you a lot of money. Just click on the button below to schedule a consultation
or use the contact form.
Ernesto Marquez
I am the Project Director at Concurrency Labs Ltd, ex-Amazon (AWS), Certified AWS Solutions
Architect and I want to help you run AWS optimally, so your applications reliably
generate revenue for your business.
Running an optimal AWS infrastructure is complicated - that's why I follow a methodology that makes it simpler to
run applications that will support your business growth.
Do you want to learn more? Do you have other questions related to AWS? Click on the button below to schedule a free 30-minute consultation.