These days it’s hard to escape the term Internet of Things (IoT). There is a lot of buzz and a lot of experimental stuff around IoT, but there are also some real applications and opportunities in this space. For example, the AWS IoT service was announced last October and it became generally available in December 2015.
AWS IoT is a group of components that cover pretty much everything you would need to build an IoT application. It provides the infrastructure to securely connect internet-enabled devices, and organize messaging to and from these devices as well as process incoming data. Additionally, it provides a number of SDKs that can be used in embedded software and also for managing IoT resources in the AWS cloud.
There are great opportunities for IoT developers, but there are also difficult performance challenges that IoT brings with it. For example, a very large number of devices will stream non-stop data to your application. When state changes occur in these devices (i.e. a sensor detects motion), there will be things expecting a prompt and reliable response from your application. IoT requires backend infrastructure to process great volume of incoming data in real-time and also to calculate analytics on a very large scale.
In this post I will show you a method you can use to simulate any number of internet-enabled things that send data to AWS IoT. Creating a large amount of “thing” transactions is useful to validate scenarios such as the following:
- Collecting metrics and measuring how the cloud side of your IoT application responds to incoming data (i.e. Lambda functions, EC2 instances, Dynamo DB tables, Kinesis streams, etc). Can your AWS resources handle the expected volume of incoming transactions? What infrastructure do you need to provision in order to handle such volume? For example, number and types of EC2 instances, read/write capacity units in Dynamo, shards in Kinesis, etc. How much will it cost you to run the application when X devices are connected to it and send Y transactions per second?
- Measuring how quickly internet-enabled devices will receive a signal to do something after they report a change in state. For example, how long does it take for an actuator to move based on a sensor that changed state and met a condition? (i.e. a temperature control system that needs to update a heat source based on a temperature reading)
In this post I will set up an EC2 instance with Locust.io and will generate load to AWS IoT. In future posts I will cover more specific test scenarios and validations.
Why Locust and not JMeter?
Locust is a popular open source load testing tool that allows you to create test scenarios by writing Python code. Unlike JMeter, you don’t need to create XML files or install plug-ins. With Locust you can use any Python library, create your own Python modules and use them in your performance tests. Since AWS IoT uses the MQTT protocol to transfer data from and into devices, I needed a way to simulate MQTT transactions to an AWS IoT endpoint. In addition to MQTT, AWS IoT uses TLSv1.2 to encrypt data and as of today I couldn’t find a JMeter plug-in that supports both MQTT and TLSv1.2. I also find Locust to be a very effective tool to write and execute load tests.
With Locust I can use the Paho MQTT Client Python library, which is a widely used MQTT client. I used Paho to publish messages to AWS IoT as well as to subscribe to AWS IoT topics. Paho also supports TLSv1.2. For this exercise I forked an existing MQTT Locust module, which I modified extensively. Below is a link to my GitHub repo:
View MQTT Locust repo in GitHub
Pre-requisites
I will assume the following knowledge:
- You are familiar with virtualenv. If you are not, don’t worry, it’s a very simple and useful way to set up an isolated Python environment. It literally takes 5 minutes to set up and use.
- You know how to launch an EC2 instance, SSH and upload files into it.
- You have basic knowledge of the AWS IoT service. The following AWS IoT components are particularly relevant in this post:
- Message broker
- Device gateway
- Security and identity service
- You have basic knowledge of command line and Python.
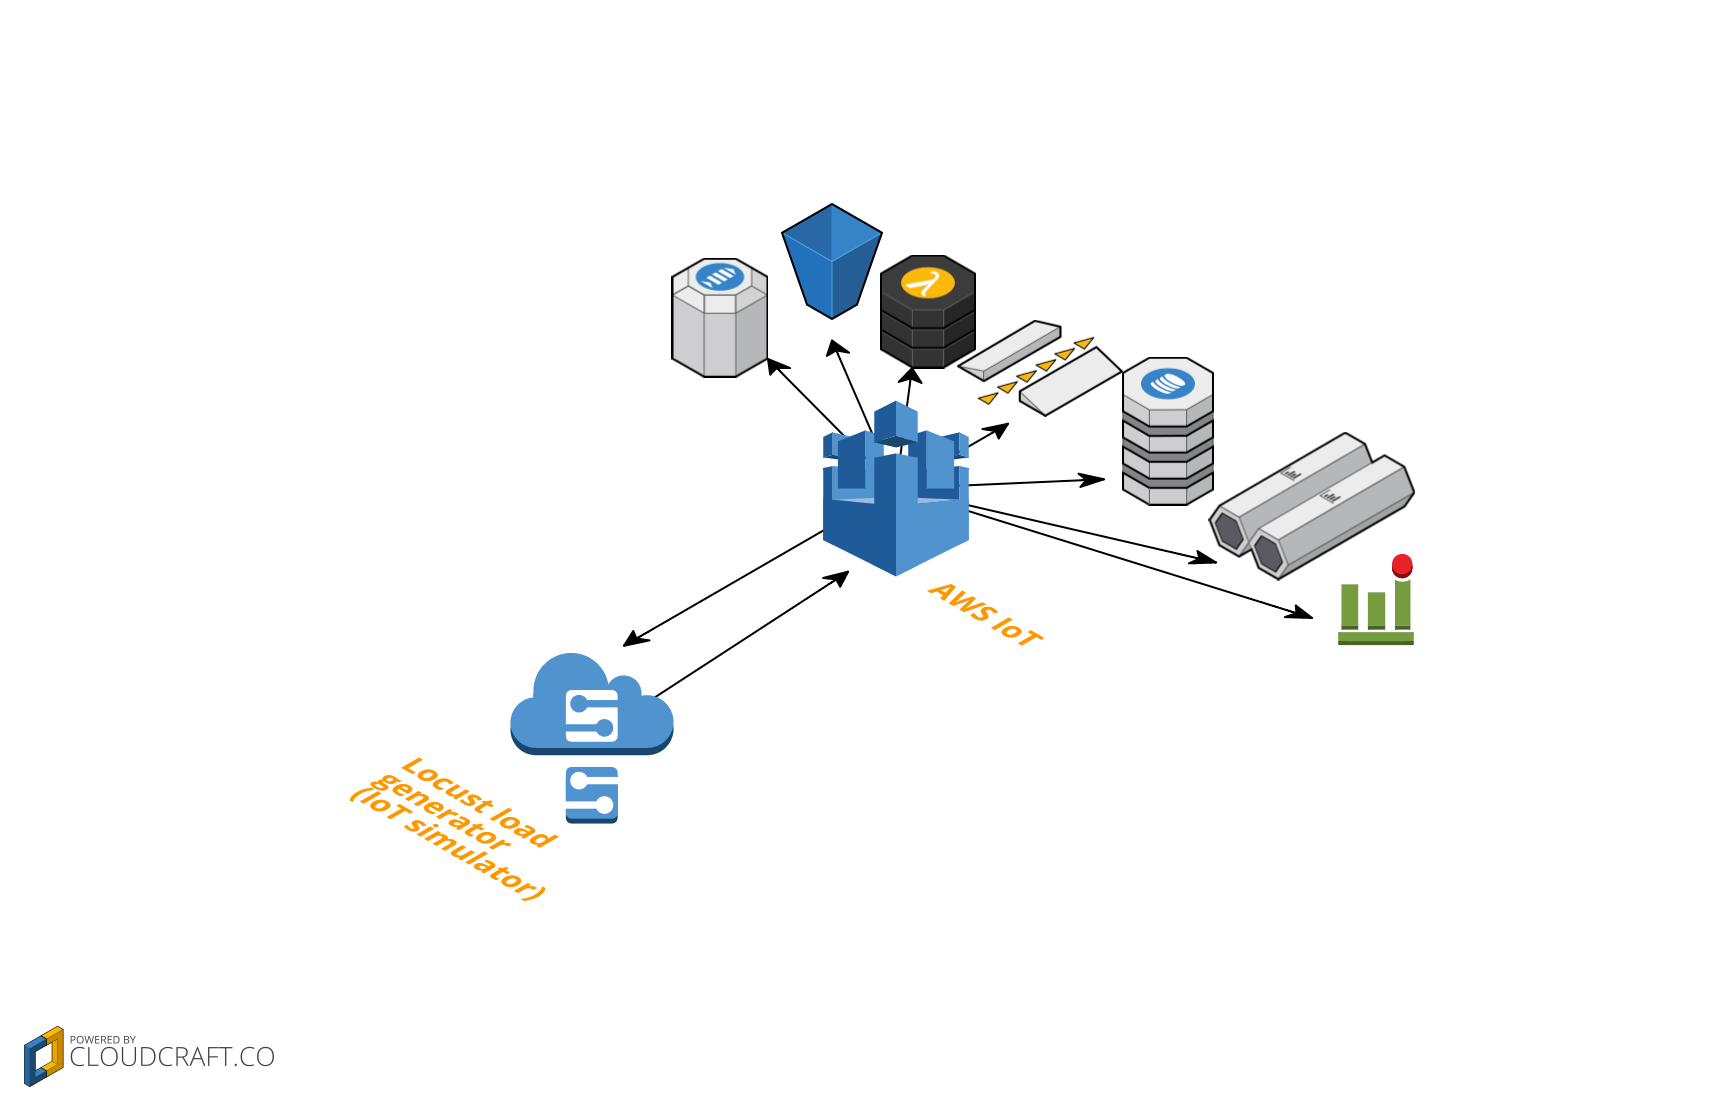
Architecture
In this setup we will create virtual IoT devices using Locust, which will publish messages to the AWS IoT message broker. AWS IoT allows developers to configure rules that integrate with other AWS services, such as Dynamo DB, Kinesis, Lambda, S3, SNS, SQS or CloudWatch. For this example I will create an AWS IoT rule that integrates with AWS Lambda.
Setting up Locust (using virtualenv - recommended)
Launching an EC2 instance
In this example we will install Locust in an EC2 instance with the following considerations:
- Use Amazon Linux OS. The code in this post is tested on AMI 2015.09.2
- Make sure the Security Group allows incoming traffic on TCP port 8089 (the default port Locust uses for its web interface) and also allows incoming SSH traffic on TCP port 22.
- Use any instance type, but a t2.nano or t2.micro are more than enough for this exercise.
Python version and other dependencies
In order to test AWS IoT using Locust we need to have Python 2.7.9 or greater (but not Python 3). Why?
- AWS IoT requires TLSv1.2 in order to establish secure communications with devices. Support for TLSv1.2 is available starting in Python 2.7.9
- Locust doesn’t work with Python 3.
TLSv1.2 also requires that we have OpenSSL version 1.0.1 or greater installed in our system.
Fortunately, the Amazon Linux AMI (AMI 2015.09.2) I used for this example already meets those 2 dependencies. To double check, just run the following commands once you launch your instance and SSH into it:
python --version
openssl version
Setting up the Locust environment using virtualenv
Virtualenv is a tool that creates isolated Python environments. When you create a virtualenv environment, you can have dependencies that are different from the overall system dependencies. For example, you could run Python 2.7.10 in your environment while your system is running Python 3. This is very handy and allows us to have total control over which dependencies our working environment is running on.
First let’s make sure everything is up to date in our new EC2 instance:
sudo yum update -y
Virtualenv is already installed in the Amazon Linux AMI, so I just have to run the following command from my home directory (~) :
virtualenv mqtt-locust
This creates folder ~/mqtt-locust and a folder structure inside it, which contains the
dependencies for this environment.
The next step is to activate my environment. From the ~/mqtt-locust folder, run:
source bin/activate
This command updates the $PATH variable, putting the ~/mqtt-locust folder in front of all
other directories.
Then we need to install GCC (GNU Compiler Collection) and GCC-C++, which are required for the Locust installation:
sudo yum install gcc
sudo yum install gcc-c++
Once this is complete, we can proceed to installing Locust:
pip install locustio
Just to double check, you could run the locust --help command to make sure things were installed properly.
For this example, I installed Locust version 0.7.3.
If you want to run distributed tests in the future, you’ll have to install pyzmq as well:
pip install pyzmq
More details on how to install locust.io are here.
Creating a basic locust HTTP test (optional)
This section is useful only if this is your first time playing with Locust.
Now that Locust is installed in the virtualenv, I am ready to write my tests. Create a file
called locustfile.py in the root folder, with the following code:
from locust import HttpLocust, TaskSet

def index(l):
    l.client.get("/")

class UserBehavior(TaskSet):
    tasks = {index:1}

    def on_start(self):
        index(self)

class WebsiteUser(HttpLocust):
    task_set = UserBehavior
    min_wait=1000
    max_wait=2000
And you can run the test with the following command (from the root folder):
locust --host=http://concurrencylabs-dummyendpoint.s3-website-us-east-1.amazonaws.com
Then go to http://<EC2 instance public DNS or public IP>:8089/ and start a test (10 users with a hatch value of 1 will do).
You should see something like this:
Creating a Locust MQTT test that talks to AWS IoT
Now that you have created a basic HTTP test, we can move to the more interesting part, which is creating a test using the MQTT protocol and TLSv1.2.
Installing the Paho MQTT client
For our AWS IoT test we also need to install the Paho MQTT client. From the ~/mqtt-locust active
virtualenv, run the following command:
pip install paho-mqtt
We also need a Python module that Locust will use to create connections, publish and subscribe
to MQTT topics. The GitHub repo below contains the mqtt_locust.py module, which contains a MQTTLocust
class that instantiates a Paho MQTT client. Make sure this file is in the ~/mqtt-locust/ folder in your instance.
The repo also has the Locust test file that I wrote to publish messages to AWS IoT: aws-iot-publish.py. Make
sure this file is available in the ~/mqtt-locust folder in your EC2 instance. In this
test each “thing” connects to the AWS IoT message broker and publishes a message at a random
interval between 1000 and 1500 milliseconds. Each virtual thing represents a temperature
sensor that publishes a random value between 0 and 10:
class ThingBehavior(TaskSet):
    @task
    def pubqos0(self):
        topic = os.getenv('MQTT_TOPIC','')
        if topic == '':
          raise ValueError("Please set environment variable MQTT_TOPIC")
        self.client.publish(topic, payload=self.payload(), qos=0, name='publish:qos0:'+topic, timeout=PUBLISH_TIMEOUT)

    def on_start(self):
        #allow for the connection to be established before doing anything (publishing or subscribing) to the MQTT topic
        time.sleep(5)


    def payload(self):
        payload = {
           'temperature': random.randrange(0,10,1) #set temperature between 0 and 10
           }
        return json.dumps(payload)
See the MQTT Locust repo in GitHub
Setting up AWS IoT components
Thing Registry
For simplicity, in this exercise we won’t create devices in the AWS IoT Thing Registry. In a more realistic example we would create one thing in the registry per each simulated locust thing. Ideally each instantiated Paho client should have a client_id that matches the thing_id in the AWS IoT Registry. If we don’t specify a client_id, Paho creates a random client_id each time a client is instantiated.
Certificates
We need to create at least one set of certificates. The process goes like this: 1)Create an X.509 certificate as well as public/private key files in AWS IoT, 2)Create and attach an IAM policy to your AWS IoT certificate 3)Link the certificate to each thing in the registry, 4)Download a root CA certificate. In a production environment you might assign one certificate per thing in the registry or one certificate to multiple things - it’s up to your application needs.
Steps 1-3 are documented here (for this test you don’t need to complete step 3 - link the certificate to each thing in the registry). Step 4 is documented here.
Once you have all your .pem files in place, upload them to the EC2 instance. The test will get the location of the .pem files from environment variables, therefore you have to run the following:
export CA_CERT=<full path to your CA certificate .pem file>
export IOT_CERT=<full path to your AWS IoT certificate .pem file>
export IOT_PRIVATE_KEY=<full path to your AWS IoT private key .pem file>
Rules
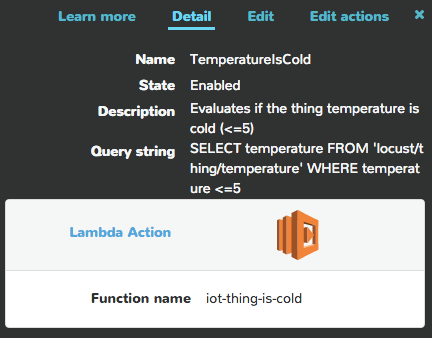
My “sensors” publish a message to a topic that I named locust/thing/temperature. I
configured two rules in AWS IoT: one rule triggers a specific Lambda function if the temperature reading
is <=5 (SELECT temperature FROM ‘locust/thing/temperature’ WHERE temperature <=5) and the
other rule triggers a different Lambda function if the temperature is greater than 5
(SELECT temperature FROM ‘locust/thing/temperature’ WHERE temperature >5).
AWS IoT Endpoint
AWS IoT assigns an endpoint to your account in each region. This is the MQTT endpoint your things will connect to. You can get your endpoint address with this AWS CLI command:
aws iot describe-endpoint
The endpoint will look something like this: <random-value>.iot.us-east-1.amazonaws.com
Running a Locust load test with Paho MQTT client
The test file also reads the MQTT topic from environment variable MQTT_TOPIC, for this exercise I set the variable to the following value:
export MQTT_TOPIC=locust/thing/temperature
Now we’re ready to hatch a swarm of “things”! Make sure ~/mqtt-locust/mqtt_locust.py and
~/mqtt-locust/aws-iot-publish.py are ready and that your environment variables are
set correctly (CA_CERT, IOT_CERT, IOT_PRIVATE_KEY, MQTT_TOPIC).
Now we are ready to execute:
locust --host=<my AWSIoT endpoint> -f aws-iot-publish.py
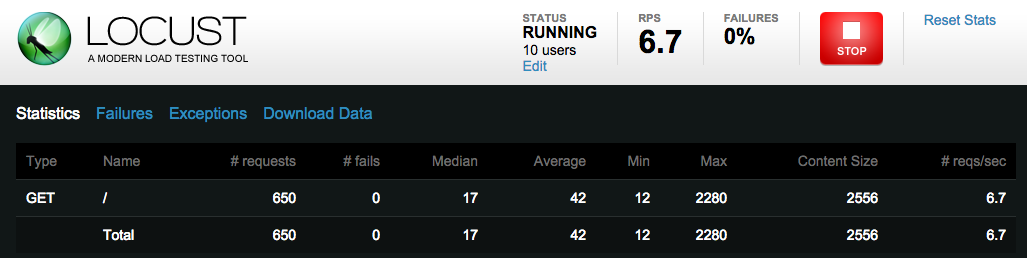
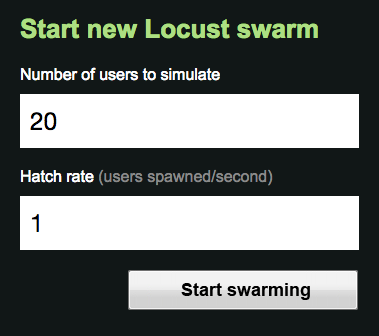
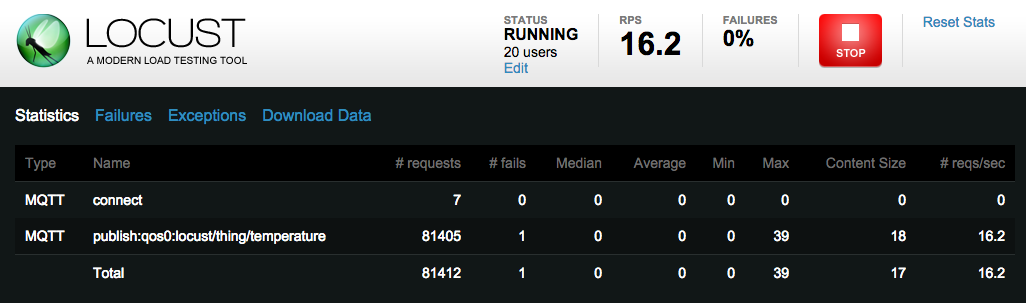
The purpose of this step is to generate load that will hit the AWS IoT endpoint and trigger a rule. I started a test with 20 virtual things that hatch at a rate of 1/second:
Since I configured each thing to publish a message every 1000-1500 milliseconds, this test resulted in 16 messages per second once all 20 things were hatched:
NOTE: Port 8089 in your EC2 instance is open to the world! Moving forward you should do one of the following: 1)implement rules in your EC2 security group that restrict incoming traffic to specific IP addresses, 2)run the test in no-web mode:
locust --host=<my AWSIoT endpoint> -f aws-iot-publish.py --no-web -c 20 -r 1
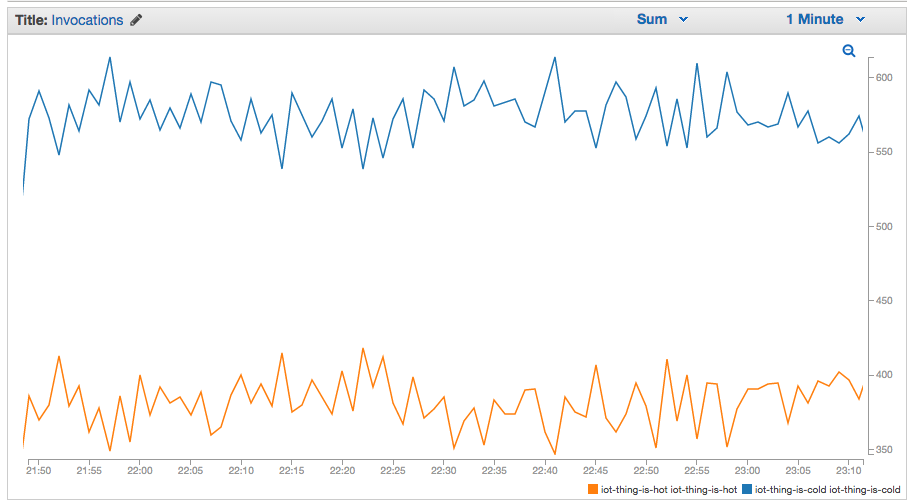
I configured two rules based on the random temperature reading in each thing, therefore each
incoming message triggered one of two Lambda functions: iot-thing-is-hot or iot-thing-is-cold.
Here are the invocation metrics in CloudWatch for these 2 functions:
To summarize
- If you are building an IoT application, you can run performance tests using Locust and the Paho MQTT client. The Paho MQTT client supports TLSv1.2, which is a requirement to connect to AWS IoT.
- Simulating a large number of things allows you to measure how your IoT application backend will react to a high rate of transactions in real life.
- With AWS IoT you create rules that respond to incoming messages from things. You can measure performance metrics for these backend components using CloudWatch.
Where to go from here
There are a few improvements to this test:
- Create things in the AWS Iot Thing Registry and update the Locust test so that each virtual thing is assigned a client_id that corresponds to a thing_id in the registry. Link a certificate to each thing in the registry.
- Implement a test with things that subscribe to the
locust/thing/temperaturetopic. The test should make these things react to a change in temperature and measure how long it takes for a temperature change to trigger a response in a different thing - for example, how long it would take for a temperature regulator to react in response to a change in temperature. - Use Thing Shadows to trigger state changes and measure the time it takes for things to respond to these changes in state.
- Instead of simulating only 20 things, run a distributed Locust test with hundreds or thousands of things.
Are you launching soon or want to make sure your products don’t crash?
I can certainly help you with planning, designing, executing and fine-tuning load scenarios for your application. Just click on the Schedule Consultation button below and I’ll be glad to have a chat!